28 Desember 2010

Faktor - Faktor Dalam Palming Koin

Beberapa faktor yang harus diperhatikan agar palming koin kita sempurna, yaitu :
1. Telapak tangan harus disesuaikan dengan ukuran koin, maksudnya jika ukuran telapak tangan kita tak cukup besar janganlah kita memainkan koin dengan diameter yg besar, maka ini pun harus disesuaikannya dengan diameter koin. Begitupun sebaliknya jika ukuran jari kita besar koin yang digunakan pun harus diperhatikan ukurannya.
2. Telapak tangan serta koin harus bersih dan tidak basah dari keringat atau air agar saat palming, koinnya tidak jatuh atau membuat telapak tangan & jari-jari kita kesulitan nantinya. Kuku juga harus bersih agar tidak terlihat jijik.
3. Perhatikan tingkat kerapatan antara setiap jari, ada saatnya kita harus merapatkan jari-jari dan ada saatnya kita membuka lebar-lebar jari-jari kita.
4. Perhatikan sudut pandang penonton dan jarak antara magician dan penonton
5. Sering-sering berlatih didepan kaca, agar kita tahu kualitas palming kita, juga dengan latihan kita akan menemukan posisi meletakkan koin yang terbaik ditelapak tangan kita
6. Hanya tambahan, bisa juga gunakan perekat seperti lem, atau double tip. Untuk routinenya.
Dibawah ini ditunjukkan, paling tidak ada 11 teknik palming koin beserta gambarnya dan bisa dikembangkan dengan routine-routine lainnya, entah kepermainan ilusi ataupun extreme magic, dsb.
Next - Faktor - Faktor Dalam Palming Koin

28 November 2010

Dragon Display Tutorial

Next - Dragon Display Tutorial

28 Oktober 2010

Passing Thru (Coin to Glass) Tutorial

 Efeknya..koin bisa menembus botol kaca,,

Next - Passing Thru (Coin to Glass) Tutorial

28 September 2010

Revolution Cut, Tutorial

Diterjemahkan dan dikembangkan dari Brian Tudor oleh Wiku Pulangasih the Online Magician. Video diambil dari Shaw 1835 via Youtube.

Deskripsi : Revolution Cut adalah sebuah Card Flourish, di mana anda menggunakan satu tangan untuk merotasi kartu di tangan anda. Gerakan ini ditemukan oleh Brian Tudor, yang kemudian membuat Revolution Cut ke dalam berbagai versi.

Prosedur :

1. Pegang kartu dalam posisi berikut di tangan kiri (gunakan tangan kanan jika anda kidal, dengan jari telunjuk dan jari kelingking di masing-masing sisi pendek kartu

2. Angkat kira-kira sepertiga bagian kartu dengan ibu jari anda.

3. Pindahkan jari telunjuk anda ke sisi panjang kartu. Pegang kartu dengan ibu jari dan jari telunjuk di kedua sisi panjang

4. Putar kartu ke arah kiri dengan ibu jari dan jari telunjuk anda, hingga kartu tersebut dipegang antara jari telunjuk dan jari manis anda.

5. Lanjutkan putaran ke arah kanan dengan jari telunjuk dan jari manis anda, letakkan kartu tersebut di bawah paket kartu lainnya.

Berikut tutorial videonya, atau bisa anda download di link berikut :
Next - Revolution Cut, Tutorial

19 September 2010

Update lagi

Tak terasa sudah hampir 4 bulan saya tak mengupdate blog ini dikarenakan berbagai alasan dan faktor-faktor dalam keseharian saya..selama hampir 4 bulan itu pula semakin banyak pula saya lihat di internet bermunculan situs - situs serupa yang membahas dan membongkar trick-trick MAGIC..

Memang masih banyak kekurangan dalam blog ini dibanding situs-situs sulap lainnya, tapi dengan beberapa apresiasi yang saya dapat dari teman-teman saya merasa sudah saatnyalah pentas hiburan Indonesia sudah harus diramaikan dengan sulap-sulap yang menghibur, mendidik, dan bertanggungjawab seiring bermunculannya situs-situs pembongkar sulap.

Jangan takut terbongkar jika anda kreatif "temukan sesuatu yang baru dari apa yang anda lihat, dengar, rasakan dst..
Justru dengan makin banyaknya trick yang dibongkar, membuat pesulap-pesulap yang sudah jadi berpikir bagaimana caranya "AGAR TRIK SAYA TIDAK TERBONGKAR"!

..Apa jadinya jika yang kita usahakan begitu lama harus berhenti ditengah jalan..Dalam postingan ini saya mengajak umumnya kepada para pencinta magic untuk lebih giat lagi mengembangkan per'magican Indonesia..

Memang saya begitu asing didalam lingkungan keluarga-keluarga,,teman-teman,,jika saya sudah berbicara magic,,tapi itu bukanlah halangan untuk terus belajar..Ilmu tak harus didapat dari seorang guru, tapi tanpa guru ilmu bisa jadi tak bermanfaat..tahukah anda siapa guru2 saya?? jawabannya adalah teman-teman semua..
Kita membutuhkan orang-orang dalam hidup ini,,tak bisa hidup tanpa orang,,

saya bukanlah siapa-siapa dalam bidang magic,,tapi saya memiliki usaha kuat untuk mengembangkan dan mempopulerkan itu semua..janganlah kita malu bertanya??walaupun kadangkala harus mengorbankan uang, waktu dan tenaga,,jika apa yang kita korbankan belum mendapatkan apa yang diharapkan,,berarti hanya dua kemungkinan 1.Kita belum ekstra berusaha, dan 2.Kita tak belajar dari pengalaman.

Mulailah dari yang kecil,,jangan berharap lebih jika tak belajar dari pengalaman
pengalaman mengajarkan saya kebahagiaan dan kesedihan dalam situasi dan kondisi apapun, intinya satu "BELAJAR"
Bravo Magic'
Next - Update lagi

26 Agustus 2010

Magic Square 5x5


Sumber : Ini adalah salah satu pengembangan Magic Square-nya Joe Sandy( 4x4). Yaitu Magic Square 5x5. Saya menemukan rumus magic square ini murni otodidak selama 4 bulan lebih setelah mempelajari rumus Magic Square 4x4, walaupun belakangan di internet pun saya menemukan juga magic square 5x5 dengan rumus berbeda. Memang sedikit aneh seorang master Joe’ tidak pernah memainkannya di TV. Apakah dia’ belum tahu atau ada alasan lain?
Sebenarnya ini adalah trik mathemagics yang paling saya kuasai, karena hampir tiap minggu saya bermain, tapi demi kemajuan sulap Indonesia saya akn membagikannya gratis.
Effect :
Aturan main Magic Square 5x5 hampir sama dengan Magic Square 4x4, namun ada sedikit penambahan perhitungan dan membuatnya menjadi lebih unik. Yaitu;
-Jika dijumlahkan secara horizontal ke-5 barisnya akan memiliki jumlah yang sama.
-Jika dijumlahkan secara vertikal ke-5 kolomnya akan memiliki jumlah yang sama juga.
-Jika dijumlahkan ke-2 diagonalnya akan memiliki jumlah yang sama juga seperti penjumlahan secara horizontal dan vertikal.
Plusnya :
-Jika dijumlahkan ke-4 kotak dipojok ditambah satu kotak dipusat pun akan memiliki jumlah yang sama seperti perhitungan sebelumnya.
-Jika dijumlahkan ke-5 kotak ditengah yang membentuk tanda + pun akan menghasilkan penjumlahan yang sama.
-Jika dijumlahkan ke-5 kotak ditengah yang membentuk tanda X pun lagi-lagi menghasilkan jumlah yang sama.
-Dan uniknya jika kita menambahkan pada lima kotak (kotak-kotak yang membentuk + dan X) yang mana saja selain ditengah, pun akan tetap sama hasilnya. Mungkin anda belum mengerti, dibawah akan saya jelaskan apa itu bentuk X dan bentuk +
Persiapan :
-Untuk Magician : Menghafal rumus Magic Square 5x5 juga bisa menghitung cepat (yang masih lambat bisa dilatih/ karena tidak ada kata terlambat), Kertas polos untuk digambar kotak 5 baris 5 kolom ( Magic Square5x5)
-Untuk Penonton : Pulpen/ spidol, dan alat bantu hitung (kalkulator, dsb).
Maka Rumusnya Adalah : Ada 2 Rumus
Rumus Magic Square 5x5 Baku

Rumus Magic Square 5x5 Dengan Menghafal Angka

Kita kosongkan 1 kotak (misal kotak E/ angka rahasia), kotak E ini paling mudah karena kita hanya menambah angkanya. Kotak yang lain pun bisa tapi campuran + dan -. Jadi, kita cukup menghafal angka
Baris 1 = 4, 21, 14, 10, angka rahasia (E),
Baris 2 = 16, 7, angka rahasia (E) + 2, 6, 18,
Baris 3 = angka rahasia (E) + 4, dengan melihat baris pertama, 3, 20, 13, 9,
Baris 4 = 17, 15, 11, angka rahasia (E) + 1, dari baris pertama, 5,
Baris 5 = 8, angka rahasia (E) + 3, dari baris pertama.
Jadi rumus ini berlaku untuk angka 49 keatas (4 + 21 + 14 + 10 = 49), sampai angka berapapun bisa asalkan yg diisi kotak E’-nya. Jika mau mengambil kotak yang lain (A, B, C, D) sebagai acuan, bisa saja tetapi rumus akan berubah.
Prosedur :
Contoh; jika angka yang dihasilkan dari campuran berbagai macam angka penonton = 74 maka angka rahasia = 74 – 49 = 25, angka yang dimasukan menjadi (4, 21, 14, 10, 25) 25 ini adalah angka rahasia yang menjadi acuan untuk mengisi baris selanjutnya.
*Catatan : untuk memulai permainan total angka penonton harus diatas 49, kalau tidak akan ada hasil minus.
Maka setelah dihitung akan muncul angka-angka sebagai berikut :
Jika garis kuning kita hitung (secara vertikal) maka jumlahnya akan 74, begitupun kolom-kolom/ vertikal selanjutnya akan sama 74.
Jika garis kuning kita hitung (secara horizontal) maka jumlahnya akan 74, begitupun baris-baris/ vertikal selanjutnya kan sama 74.


Jika dijumlahkan kelima kotak di tiap diagonal maka akan menghasilkan jumlah yang sama = 74

Ini maksud saya dengan tanda X dan +
‘Tanda X


Jika anda menjumlahkan kelima kotak yang terkena garis hijau maka akan menghasilkan angka yang sama 74
‘Tanda +

Jika anda menjumlahkan kelima kotak yang terkena garis merah maka akan menghasilkan angka yang sama.74
Bonus tambahan kelebihan dari Magic Square 5x5
Jika anda menjumlahkan lingkaran yang berwarna merah, anda pun akan mendapat angka 74, dan sekilas juga membentuk tanda +.

Jika anda menjumlahkan lingkaran yanmg berwarna merah, anda pun akan mendapat angka 74, dan sekilas juga membentuk tanda X.

Tanda ‘+ lain dan Tanda ‘X lain yang menghasilkan bilangan 74

Initnya ada 32 perhitungan berbeda yang akan menghasilkan jumlah 74 jika mengikuti aturan diatas.
Kesimpulan : Seperti kutipan dari ‘Joe Sandy ‘ di THE MASTER season 1 saat memainkan Magic Square 4x4, kurang lebih begini bunyinya ‘jika kita mampu menggabungkan kekuatan otak kiri, otak kanan, otak besar, otak kecil dan otak tidak waras kita maka kita mampu untuk mengisi magic square 4x4 yang saya lakukan barusan’, maka pesan tambahannya adalah dalam magic square 5x5 ini pikiran positiflah (tanda + ) yang membentuk pikiran positif sehingga mampu membantu menyeimbangkan angka- angka dalam 25 kotak ini sehingga bisa memiliki jumlah yang sama , walaupun ada juga tanda ‘X’/ miring, tapi jika kita melihatnya dari sisi lain (miring) maka ia akan tetap menjadi terlihat +, ‘maka berpikirlah positif disetiap kejadian yang kita lihat agar kita bisa mendapatkan pelajaran yang berharga darinya demi kesuksesan dimasa depan.
Next - Magic Square 5x5

30 Juli 2010

Cara Melakukan Hipnotis

Ditranslasikan dan dikembangkan dari Intro to Hypnotis oleh Wiku Pulangasih the Online Magician


Definisi : Hipnotis adalah salah satu cabang magic yang digunakan untuk bermain dengan alam bawah sadar manusia. Setelah seseorang memasuki alam bawah sadarnya, kita bisa menanamkan sugesti tertentu dalam pikiran mereka, dan membuat mereka melakukan hal-hal yang kita perintahkan.

Perlu Diketahui :- Hipnotis (terutama "extreme hypnotist" seperti yang sering dilakukan Romi Rafael) hanya akan berhasil apabila sang objek (sukarelawan) bersedia dihipnotis.
- Alam pikiran manusia dibagi menjadi dua, yaitu alam sadar (conscious mind) dan alam bawah sadar (unconscious mind). Tujuan hipnotis adalah membuat sang sukarelawan berada di alam bawah sadar mereka. Keadaan setelah sang sukarelawan melakukan berbagai macam hal dalam pengaruh alam bawah sadar disebut "trans".

Prosedur :
1. Percaya Diri
Sebelum melakukan hipnotis, anda harus benar-benar yakin dan percaya bahwa anda mampu menghipnotis orang lain. Yakinkan diri anda bahwa anda adalah seorang ahli hipnotis yang hebat. Tanpa rasa percaya diri, hipnotis yang anda lakukan pasti gagal.

2. RitmeSesuaikan ritme suara anda dengan kecepatan nafas sang sukarelawan. Hal ini bisa dilakukan dengan memperhatikan gerakan rongga diafragma saat sang sukarelawan bernafas. Saat yang paling tepat untuk menggiring sang sukarelawan memasuki alam bawah sadar mereka adalah saat mereka sedan menghembuskan nafas (seperti yang sering dilakukan oleh Romi Rafael).
Biasanya, jika hipnotis berjalan dengan sukses, tempo dan ritme nafas sang sukarelawan menjadi lebih lambat. Saat itu, perlambatlah tempo dan ritme bicara anda sesuai dengan ritme nafas sang sukarelawan.

3. Nada Suara
Ada dua macam nada suara yang dapat digunakan dalam hipnotis.

a. Nada Suara Monoton
Metode ini sering dipakai oleh Romi Rafael. Nada suara monoton adalah nada suara yang datar dan cenderung sama dari awal sampai akhir, dengan penggunaan kata yang terus-menerus diulang. Tujuan menggunakan nada suara monoton adalah agar alam sadar sang sukarelawan merasa bosan, sehingga ia lebih mudah memasuki alam bawah sadarnya.

b. Nada Suara Bergelombang
Nada suara yang dipakai adalah nada suara naik-turun, lemah-keras, rendah-tinggi. Pelaku hipnotis mula-mula akan berbicara dengan nada rendah, kemudian semakin meninggi hingga membawa sang sukarelawan ke dalam keadaan "trans".

Silakan pilih salah satu nada suara yang sesuai dengan kepribadian anda. Pilihlah yang paling nyaman dan enak saat anda mengucapkannya.


4. Membawa sang sukarelawan memasuki alam bawah sadar

Pertama, perintahkan sang sukarelawan untuk melakukan suatu rutinitas, misalkan "Berhitunglah dari 1 sampai 10, tiap-tiap hitungan akan membuat anda memasuki alam bawah sadar anda".
Atau "Tarik nafas dalam-dalam...dan hembuskan".
Atau tanyakan "Siapakah nama anda?"

Di tengah-tengah proses itu, jabat tangannya, tatap matanya, dan lakukan sesuatu yang mengejutkan sehingga ia dengan cepat memasuki alam bawah sadarnya. Sesuatu yang mengejutkan itu antara lain :

-. Menyentakkan jabatan tangan
-. Mengangkat pergelangan tangannya ke atas
-. Menjentikkan jari anda ke dahi sukarelawan

Ingat, saat melakukan hal-hal tersebut, tetap pertahankan kontak mata dengan sang sukarelawan. Setelah itu, buat sang sukarelawan melakukan hal-hal yang anda perintahkan dengan kalimat hipnotis.

5. Kalimat Hipnotis
Kalimat-kalimat hipnotis harus diucapkan dengan lancar, tanpa kata-kata seperti "eee...", "mmm..", "eh...", dan sebagainya. Kalimat hipnotis biasanya adalah kalimat perintah bernada sugestif, singkat, padat, dan diucapkan berulang-ulang.

Contoh kalimat hipnotis :
Hal pertama yang harus anda lakukan adalah......

Membuat diri anda merasa nyaman.....
Duduklah di kursi dengan kedua tangan di atas paha....
Setelah anda merasa nyaman.......
Fokuskan pandangan mata anda ke satu titik.....
betul......
Arahkan pandangan mata anda ke titik ini.......
Mata anda akan semakin berat......
Semakin berat.....
Dan anda akan tertidur......

(........) menandakan anda harus memberikan jeda sebelum menuju ke kalimat selanjutnya.

Anda sekarang berada di tepi pantai yang indah...
Sangat indah....
Dan akan menjadi lebih indah......
Anda akan melihat ombak dan buih....
Angin sepoi-sepoi...
Pohon kelapa yang teduh.....
Rasakan semuanya.....
Rasakan dengan seluruh panca indra anda.....
Masuklah ke dalam air.....
Rasakan dinginnya....
Gunakan kedua tangan anda untuk berenang melewati lautan....
dsb....dsb....

Untuk menyadarkan kembali sang sukarelawan, anda bisa menggunakan kalimat berikut :

Anda akan melihat sebuah perahu....
Yang siap membawa anda meninggalkan pantai ini...
Tapi anda akan tahu....
Segala memori indah tentang pantai ini akan tetap ada dalam pikiran anda....
Ketenangannya....
Keteduhannya...
Jadi....
Naiklah ke perahu tersebut.......
Dan anda akan menemukan suatu pesan tertulis di perahu itu...
Mulailah berhitung dari 1 sampai 10.....
Dan tiap hitungan aakan membawa anda meninggalkan alam bawah sadar...
Dan kembali ke alam sadar....
dst...dst...

Yang perlu diingat, tempo, ritme, nada, dan volume saat mengucapkan kalimat hipnotis harus konsisten.
Hipnotis adalah cabang ilmu magis yang sangat sulit dikuasai. Untuk menguasainya diperlukan waktu yang tidak sebentar. Jadi, bila anda mempraktekkan hal-hal yang tertulis di sini namun masih gagal dalam melakukan hipnotis, hal itu sangatlah wajar. Teruslah berlatih dan berlatih, maka anda akan menjadi ahli hipnotis yang ulung.
Next - Cara Melakukan Hipnotis

29 Juni 2010

Joker Ajaib

Ditranslasikan dan dikembangkan dari David Blaine oleh Wiku The Online Magician

Effects : Anda meminta sukarelawan mengambil sejumlah kartu dari tangan anda. Kemudian kartu dipegang di belakang punggung masing-masing (tertutup/ menghadap ke bawah). Anda dan sukarelawan mengambil satu kartu mana saja dari tumpukan kartu masing-masing tanpa melihatnya, dan menaruhnya ke depan . Kemudian anda saling menukar kartu yang ada di depan anda. Dengan tanpa melihat kartu masing-masing, anda memerintahkan sukarelawan agar memasukkan kartu tersebut dalam posisi menghadap ke atas (terbuka) ke tengah-tengah tumpukan kartu di belakang punggungnya. Anda juga melakukan hal yang sama. Tumpukan kartu dibawa ke depan, dan dibuka dalam bentuk seperti kipas. Di masing-masing tumpukan, hanya ada satu kartu dalam posisi menghadap ke atas, dan hebatnya, masing-masing kartu di tumpukan tersebut sama-sama Joker.

Trik :

- Pastikan anda meletakkan 2 Joker di dasar tumpukan kartu. Berapapun kartu yang diambil penonton dari tangan anda pasti tidak akan mengusik kartu Joker tersebut.

- Saat membawa kartu ke depan, ambil kartu Joker dari paling bawah.

- Saat anda menukarkan kartu anda dengan sukarelawan, sang sukarelawan pun akan membawa kartu Joker anda.

- Anda akan membawa kartu non-Joker dari sang sukarelawan. Kuncinya, tetap letakkan kartu non Joker tersebut dalam posisi tertutup (menghadap ke bawah). Ambil Joker kedua di dasar tumpukan kartu anda, masukkan ke tengah dalam posisi menghadap ke atas.

-Bawa masing-masing tumpukan kartu ke depan, bicaralah sedikit tentang teori probabilitas atau daya magis kartu Joker. Katakan, "Sadarkah bahwa sedari tadi saya telah memanipulasi pikiran anda sehingga anda memilih kartu tertentu?" Buka kartu masing-masing dalam bentuk seperti kipas dan akan tampak bahwa anda berdua memiliki kartu Joker yang menghadap ke atas.

Tambahan : Trik serupa juga bisa digunakan untuk memunculkan 2 kartu di masing-masing tumpukan kartu dalam nilai yang sama (misal : As), bisa juga digabungkan dgn prediksi dalam amplop.
Next - Joker Ajaib

22 Juni 2010

Kartu Yang Terlihat Tembus Pandang

Effects : Anda meminta dua orang penonton maju ke atas panggung. Anda memberi mereka satu pak kartu untuk dikocok. Kartu kemudian disebarkan di atas meja dalam posisi tertutup. Dengan metode Clairvoyant (penerawangan tembus pandang) anda mengambil tiga kartu dari 52 kartu yang tersebar dan setelah dibalik, sambil mengucapkan nama kartu tersebut keras-keras. Ternyata ketiga kartu tersebut sesuai dengan yang anda sebutkan.

Prosedur :
1. Setelah anda meminta sang sukarelawan mengocok kartu, perhatikan kartu paling bawah, dan hafalkan nilainya (misal As Keriting)

2. Ketika menyebar kartu, pastikan anda mengetahui posisi kartu paling bawah (As Keriting)

3. Katakan dengan keras, "Saya akan mengambil kartu As Keriting (kartu paling bawah)!". Ambil kartu manapun selain As Keriting, lihat nilai kartu tersebut, tapi jangan biarkan sang sukarelawan melihatnya. Misal nilai kartu tersebut 9 hati, tetap katakan,"Wow! Saya benar!"

4. Katakan lagi "Saya akan mengambil kartu 'x' (ganti kata x dengan nilai kartu yang anda peroleh di nomor 3, dalam contoh kali ini adalah 9 hati). Ambil kartu manapun selain As Keriting, lihat nilai kartu tersebut, tapi jangan biarkan sang sukarelawan melihatnya. Misal nilai kartu tersebut 2 wajik, katakan lagi,"Wow! Saya benar lagi!"

5. Katakan lagi "Saya akan mengambil kartu 'x' (ganti kata x dengan nilai kartu yang anda peroleh di nomor 4, dalam contoh kali ini adalah 2 wajik). Sekarang, ambillah kartu As Keriting yang telah anda ketahui posisinya.

6. Bawalah tiga kartu yang telah anda pilih. Tanyakan pada sukarelawan "Anda pasti tidak percaya saya telah mengambil kartu yang tepat, betul?" Tunjukkanlah nilai ketiga kartu yang anda ambil, dan ternyata nilainya tepat! (As Keriting, 9 Hati, dan 2 Wajik)

Tips : Letakkan kartu yang pertama anda pilih di atas kartu kedua, dan letakkan kartu ketiga di paling atas agar urutannya sesuai.
Agar sang sukarelawan lebih mudah mengingat kartu yang akan anda ambil, minta ia menuliskan nilai kartu yang anda teriakkan di atas kertas/ papan tulis.
Next - Kartu Yang Terlihat Tembus Pandang

31 Mei 2010

Simple Flourish (Noir, Little Genesis, Neutrino)

Ini adalah 3 tehnik flourish simple mengatur posisi kartu atas dan bawah tetap pada tempatnya


Next - Simple Flourish (Noir, Little Genesis, Neutrino)

30 Mei 2010

Short For Sorcery

By Richard Robinson
The magician shuffles the deck, or someone else can. He riffles the ends of the cards, asking a spectator to tell him when to stop. At that point he cuts away the top cards and extends the rest of the cards towards the spectator, asking that the selected card be taken, looked at and returned.
A quick shuffle, then the magician declares the card gone, existing only in the spectator's imagination. He riffles slowly through the deck. The spectator does not see his card.

The magician informs the spectator the card was never in the deck to start with. He says the reason he knows that is because it is in the card box. The spectator opens the card box and discovers a single card inside, the one he selected.
Short For Sorcery is based on an effect briefly described by U.F. Grant and essentially uses the Svengali deck principle without needing a Svengali deck. Despite the method being reliable, it requires the proper handling, especially when slowly riffling the cards to show the selected one is missing. This takes some practice to ensure the cards are riffled slowly so that every card in the deck is briefly seen.
Setup
A deck of cards, one of which has been trimmed down at one narrow end to make a short card. A duplicate of this card which is left in the card box.
Handling

The right hand holds the narrow ends with fingers and thumb, pulls up on the cards and lets them escape slowly as the spectator is asked to say 'Stop.'
Lift off the cards above the short card and extend the left hand, asking the spectator to take the card he stopped at.

Above left: side view: Slowly riffle through the cards. The short card will not be seen.
Above right: spectator's view: Each card is momentarily visible, but the selected card is not among them.
Performance
Shuffle the cards, then cut the deck at the short card and complete the cut. This puts the short card somewhere near the center of the deck.
Hold the deck in the left hand, backs up in dealing position. The right hand moves over, takes hold of the narrow ends with fingers and thumb, pulls up on the cards and lets them escape slowly as the spectator is asked to say 'Stop.'
When the spectator indicates enough is enough, lift off the cards above the short card and extend the left hand, asking the spectator to take the card he stopped at, look at it, and return it to the deck.
Replace the top stock, shuffle the cards and again cut the short card to the center of the deck.
Take the ends of the deck in the right hand, turn the deck face up and with the left hand providing some support, slowly riffle through the cards. The short card will not be seen, and the spectator will admit that his card is no longer in the deck.
Ask the spectator to pick up the card box and look inside where he will discover his selected card. This provides enough activity to palm off the short card. Or it can remain in the deck for further use.
Next - Short For Sorcery

20 Mei 2010

Mengetahui Nomor PIN Orang Lain

Trik ini disubmit oleh Mifta Nurdin, peserta Yanamagic Competition I April 2010

Efek :  dapat mengetahui nomor PIN ATM seseorang melalui perhitungan mathmagic.

Alat :
1. Kalkulator
2. Selembar kertas
Prosedur :
1. Panggil satu orang penonton yang memiliki kartu ATM ke atas panggung.

2. Katakan bahwa Anda mampu mengetahui nomor PIN seseorang dengan perhitungan math magic tetapi hanya 50 % saja tingkat keberhasilannya (hal ini dikatakan agar penonton mau bermain dengan Anda.


3. Berikan kalkulator kepada penonton tersebut).


4.a. Suruh penonton untuk memasukkan digit pertama nomor PINnya pada kalkulator kemudian dikalikan dengan 2, ditambah 5, dikali 5, lalu ditambah dengan digit kedua nomor PINnya, dikali 10, kemudian ditambah dengan digit ketiga nomor PINnya, dikurangi 139, dikali 12, dibagi 3, dikali 2,5, ditambah dengan digit keempat (digit terakhir) nomor PINnya, ditambah 1, dikali 4, dikali 12,5, dan yang terakhir tambahkan dengan usia penonton tersebut (sebelumnya, suruh penonton menuliskan dulu 4 digit nomor PINnya pada selembar kertas agar penonton tidak berbohong). Suruh penonton untuk mengatakan hasil akhirnya, pasti ada 6 digit angka.


4.b. Untuk mengetahui nomor PINnya, kurangi hasilnya dengan 111100. Empat digit pertama adalah nomor PINnya. Dua digit angka terakhir adalah usia penonton. Jangan hiraukan itu. Hal tersebut hanya untuk memanipulasi pikiran penonton.


5. Setelah Anda mengatakan nomor PIN penonton tersebut, katakan bahwa dia harus segera mengganti nomor PINnya.


Uji kebenaran trik :

misal : nomor PIN penonton adalah 1234 dan usia penonton adalah 36.
(1 x 2 + 5) x 5 = 35
(35 + 2) x 10 + 3 - 139 = 234
(234 x 12 : 3 x 2,5) + 4 = 2344
(2344 + 1) x 4 x 12,5 x 2 + 36 = 23436
 23456 - 111100 = 123436 --> 4 digit pertama adalah nomor PIN penonton.

Amanat :
Jangan ceritakan sesuatu yang menjadi rahasia bagi diri Anda kepada orang yang baru Anda kenal.

Nama : Mifta Nurdin
TTL : Tegal, 22 Januari 1994
Alamat : Margasari, Tegal
Sekolah : SMA N 1 Balapulang
Blog : miftamagic.blogspot.com
Aliran : mentalist, mathmagic
Title : The Prince of Number
Next - Mengetahui Nomor PIN Orang Lain

Half and Half Trick

Half And 
Half Magic Trick Card Trick

Like most mentalist tricks, the Half and Half trick gives the audience a false choice before revealing that the magician is a master of mind reading.
The Effect
The magician holds aloft a large sheet of cardboard. Along either side five cards are held in place with an elastic band, backs to the audience. At the top is a clip. The magician declares he will read the mind of a spectator and asks that one step forward. The magician takes a marker and writes on the side of the card board closest to him - “My prediction” he says. At this point he asks the spectator to point to one of the ten cards. The magician takes the card and places it under the clip on his side of the board and then turns it to show that the card chosen matches his prediction written large and bold before hand.
The Secret
The false choice created by making ten special cards in advance is the secret here.
Materials
Ten special cards are made (instructions below) and either a large clipboard with a notepad or a sheet of cardboard and a clip. Elastic bands and a marker round out the materials.
Preparation
The magician creates the special Half and Half cards and then places them in the bands. The notepad should be attached to the clip and the marker placed nearby.
This trick is more effective with a sheet of cardboard and a clip, but using a large clipboard with paper allows for reusing it for the next show. There are two parts to this trick - creating the cards and then performing Half and Half.

Creating the Cards

magicain shows cut cards 
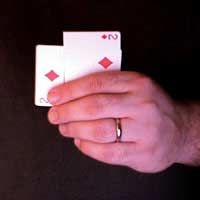
This trick requires ten identical cards and ten indifferent cards – the magician should make sure that one of the indifferent cards is not the same as the ten identical cards. Each of the indifferent cards should be cut across the width; about a third of the card is required. Each indifferent third is then glued atop one of the ten “force cards”, so called because the magician is forcing the spectator to chose this card unbeknownst to him. magician shows tampered with card 
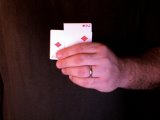
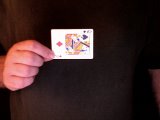
When done the card should be two thirds force card and one third indifferent card. 20px 
break

Performing the Trick

  1. Magicain has ten cards attached to a clip board 
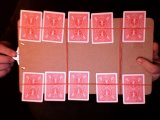
The ten cards are placed under the elastic on the back of the cardboard sheet. From the magician’s point of view only the indifferent end should be visible. 20px 
break
  2. The magician chooses a spectator and then declares he will look into the future and make a predication about which of the ten cards the spectator will chose. The magician then writes the force card on the cardboard sheet, out of view of the spectator.
  3. magician takes the chosen card 
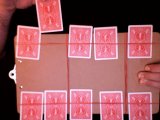
The magician allows the spectator a free choice, but not to touch the cards. After the choice is made, the magician allows the spectator one chance to change his mind and make a new choice. 20px 
break
  4. Once the choice is made, the magician takes the card (back facing the spectator) and clips it under the clip at the top of the cardboard. The indifferent end is hidden under the clip, and only the force end is visible.
  5. magician reveals the correct answer on the 
board 
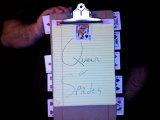
The magician then turns the board around to show that his prediction did, indeed, come true. 20px 
break

Magical Tip

Do not make the clipping of the chosen card into a performance - the more natural and quickly you can do it, the more believable this trick is.
Next - Half and Half Trick

Colour Changed

By Richard Robinson
Changing the color of a playing card by passing a hand over the face of the card was once a staple effect among conjurers. This dates from the time when cards had no corner index to disrupt the visual change of color. Although color changes have gone out of fashion, the various sleights used to accomplish them have not, since the sleights involved secretly add a card to the top of the deck.
One particular color change sleight is encountered in most introductory magic books. The deck is held, faces out, in the left hand. The closed right hand covers the deck and when it moves away the face card has changed. This is accomplished by the left index finger sliding the bottom card of the deck up, the right hand palming it and then depositing it on the face of the deck.
While this sleight is reasonably effective, it isn't that difficult for the spectators to figure out, since the right hand curls and uncurls as the card is palmed and then released.
Chris Van Bern's Colour Change
By all indications Chris Van Bern is the inventor of the original sleight on which the description above is based. However, Van Bern's method was significantly different in that the card was never actually palmed and thus the hand remained in the same position throughout the illusion.
Van Bern first published his Colour Change in the 1914 edition of the 'Wizard's Annual' and then again in 1919 in 'A Whirlwind of Wizardry' which he co-authored with De Vega, another performer of the period. It is interesting to note that by 1919 Van Bern was no longer using the move as a color change but rather to make selected cards appear on the face of the deck.
Handling

The deck is held in the left hand, one long side of the deck resting on the fingers, the other held by the thumb.
The right open right hand, with fingers together is brought over to cover the face of the deck.

As this happens, the left first finger pushes the back card of the deck up and then into the right palm. The left index finger remains extended, holding the card against the right palm. The right hand does not palm the card.

The the card makes contact with the right palm, the left hand turns at the wrist, pivoting around the left first finger tip, until the face of the deck is visible below the right hand. This is done to give the spectator's one more look at the face card. The extended left first finger is masked by the right hand and the deck during this movement.

The left hand then turns back, pivoting around the left first finger tip, until the deck is behind the right hand.

In swinging the deck back behind the hand, the left first finger is pulled away and the deck itself is used to hold the card against the right palm. The deck is turned and squared up so that the card behind the right palm is now the face card of the deck. The right hand moves away from the deck, the right fingers spreading.

As right hand moves away the face card of the deck is seen to have changed.
Display Variation

Once the card has been moved from the back of the deck into the right palm, the left first finger can slide the card back towards the right wrist. This allows the right fingers to open as the deck is swung down and the original face card shown.
Performance Notes
Once you've got the general idea of this and curbed the natural magical instinct to curl the right hand into palm position, the deceptiveness of this sleight will be apparent.
The deck can be swung up above the hand rather than below it, during the show once more move.
It is also possible for the card being held to be positioned toward the back of the right hand in more of a gambler's palm location as shown in the variation above. This allows the right fingers to spread slightly during the moves.
Van Bern suggested that the fingers of the right hand be held wide apart as the hand is placed in position so that the face card could be seen through them, then closed before the change.
Next - Colour Changed

4 Mei 2010

Ball & Silk Mistery

By Richard Robinson
The magician picks up a silk handkerchief from his table and opens the handkerchief out to display both sides at his finger tips. The handkerchief is draped over his left hand. Slowly and mysterious a large red ball rises up out of the center of the handkerchief.

The ball is wrapped in the handkerchief, the handkerchief is tossed into the air and the ball vanishes ... as if it had never existed to start with.
Props
A ball approximately 1-3/4 inches / 45 mm in diameter as used in the Multiplying Billiard Balls and other stage manipulations. A ball made of wood or hard plastic is recommended. An 18 inch / 33 cm square handkerchief. The ball and handkerchief should be of contrasting colors. The silk handkerchiefs sold by magic dealers is ideal, although any cloth square of light weight and good drape will do.
Setup
The bunched handkerchief is on the table with the ball behind it.
Handling
The ball is behind the bunched handkerchief on the table. The left hand picks up the handkerchief and ball, concealing the ball. The hands open out the handkerchief, the ball is held in the left hand. Performer's view of the ball concealed as the handkerchief is displayed.
The arms shift to the right, moving across the body. The ball is held between the base of the left hand and chest, allowing the hand to move forward and open. The arms cross, showing the back of the handkerchief. The ball palmed in the left hand is not visible.
The handkerchief is draped over the left hand. The right hand 'adjusts' the drape. The right hand goes behind the handkerchief, then under it, the thumb guiding the way, and the ball is dropped into the right hand. Performer's view of right hand catching ball.
The right hand, first finger extended, moves over the top of the handkerchief. At the same time the right thumb presses against the ball. Exposed view of the palmed ball. The right first finger pokes an indention into the top of the handkerchief. As this is done, the left thumb moves from in front to behind the ball under the handkerchief.
The first finger appears to press down the center of the handkerchief. Exposed view of the ball, ready to rise, but as yet not visible to the spectators. The ball mysteriously rises up out of the handkerchief. This action is controlled by the left thumb and fingers gently squeezing the ball.
The right hand takes hold of a back corner of the handkerchief and raises it. The left hand opens under the handkerchief and slides forward, the ball on top of the handkerchief traveling with it. The ball and hand approaching the front edge of the handkerchief. The right hand does not move during this action. The handkerchief travels back, the ball rests on the open left hand. The performer pauses so the spectators can focus on the ball. The handkerchief is then draped over the right hand.
The left hand approaches with the ball and tilts back as if rolling the ball into the waiting handkerchief covered right palm. In fact, the left hand classic palms the ball. Exposed view of the ball classic palmed. The right hand closes and turns over, the handkerchief falling down so that it appears the right hand is holding the ball through the handkerchief.
The right hand shifts position grasping the handkerchief below the center as if trapping the ball. The handkerchief is tossed into the air, caught and shaken open by the right hand to show that the ball has vanished, then opened out between the hands. The handkerchief is bunched with the ball concealed behind it in the left hand and returned to the table.
Routine
Phase 1
The left hand reaches over and picks up the handkerchief, at the same time taking hold of the ball so that it is held loosely in the palm of the hand. This hold is similar to the classic palm without any pressure being exerted on the ball.
Facing the spectators, the left and right hands come together in front of the upper chest and to the right of the center of the body.
The left and right fingers unfold the handkerchief until one corner can be clipped between the left first and second fingers. The right fingers then slide along the edge of the handkerchief, moving to the right at the same time, until they hold the adjacent corner. This opens the handkerchief out so that it is being displayed between the hands.
As the handkerchief is opened out, the magician turns his shoulders slightly to the right. The left hand moves back to the chest and presses the ball between the palm of the hand and the chest. The left fingers open out and the left hand is moved toward the right. The ball, trapped between the palm and the chest, rolls along the back of the palm. This movement stops when the ball is positioned between the heel of the left and and the chest.
With the ball out of view, the left fingers can be spread apart. The right fingers also open out. The magician looking toward the right hand, gives the handkerchief a slight shake.
Phase 2
The left hand moves back so that the ball rolls into the palm of the hand where it is classic palmed. The right hand follows the left hand's movement. The front of the handkerchief is kept parallel to the spectators.
With the ball in a classic palm, the left and right hands continue moving to the left until both arms are extended. The magician's shoulders turn left and tension is maintained by the hands to keep the handkerchief open taut between the hands.
Although the left palm is now toward the spectators, the left fingers are curled over it and the edge of the handkerchief covers them, hiding the ball.
The left hand releases its hold on the handkerchief and moves down behind the handkerchief to its center and then starts moving up. The right hand lets go of the handkerchief. The handkerchief is now draped over the left hand. The top of the left hand should be at shoulder height, the left arm half extended to the left of the body.
Phase 3
The right fingers pretend to adjust the corners of the handkerchief hanging down around the left hand. As the this is done, the left arm swings to the right until the handkerchief draped left hand is at the center of the chest. The right fingers have moved as well, getting a light hold on the hem of the handkerchief closest to the magician and working their way under the handkerchief until the right hand is under the draped handkerchief. The left hand releases its hold on the ball, dropping it into the right hand which classic palms it.
The right hand moves back down to take hold of the handkerchief hem. The left arm swings to the left, the right hand moving with it so that the back of the right hand remains toward the spectators.
The left hand then swings back to the right, the right hand moving up until it is directly behind the left hand. During this movement, the left hand opens out so that it comes to rest on the back of the right hand, almost cupping it. The right hand, now hidden from the spectators, turns palm toward the left hand so that the ball rests on the handkerchief and through it on the left palm.
The right fingers open out and point up, then curl down over the left thumb, as it pushing the center of the handkerchief down into the left fist.
In fact the right fist and second fingers have arched over the left thumb and moved down to contact the top of the ball through the handkerchief. The right thumb is pressing against the bottom of the ball. Once the right fingers and thumb are supporting the ball, the handkerchief covered left thumb swings around the left of the ball and behind it, pressing the ball through the handkerchief against the left palm.
The right hand moves away. The ball is now below the top of the handkerchief covered left fist, held in place through the handkerchief by the left thumb, and not at all visible to the audience.
Phase 4
The left hand moves up to eye height, extended a foot or so in front of the magician's face. The left hand stops. The left fingers and thumb now slowly work the ball up until it is resting on top of the left fist. The ball appears to rise up out of the handkerchief.
Once the ball is visible, the right fingers take hold of a corner of the handkerchief and move up. The left hand lowers a few inches. The left hand opens palm up under the handkerchief. The right hand pulls the handkerchief slowly back and up. This causes the ball to roll down the handkerchief and come to rest in the open left palm as the handkerchief is pulled away.
Vanish
The ball rests on the open left palm. The right hand holds the handkerchief.
The right hand moves to the left hand so that one corner of the handkerchief can be clipped between the left first and second fingers. The right hand then moves right to open out the handkerchief so that it can be displayed front and back.
In one continuous motion, the right hand releases its hold on the handkerchief, the hand opens and swings toward the front center of the handkerchief. The left hand releases its hold on the handkerchief. The result is that the handkerchief is now draped over the right hand, the hand itself being palm up under the handkerchief.
The left hand moves to the right, back of the hand turned toward the audience and appears to drop the ball onto the handkerchief covered right palm. The right fingers curl up as it holding the ball through the handkerchief. In fact, the ball is simply classic palmed in the left hand.
The right hand turns over and grasps the supposed ball through the handkerchief. With practice this can be done so that the handkerchief bunches enough at the center to momentarily look as if the ball is inside the handkerchief.
The handkerchief is tossed into the air and caught by the right hand. The ball has vanished.
The right hand shakes out the handkerchief. Then the right and left hands take hold of the top corners and show the handkerchief back and front, using the moves described in the production phase to keep the palmed ball hidden.
The right hand bunches up the handkerchief and places it on top of the ball in the left hand as the left hand opens. The right thumb presses the ball against the back of the bunched handkerchief and raises both slightly so the open left hand can be titled toward the audience. The right hand uses the bunched handkerchief to dust off the left fingers. The left hand takes hold of the bunched handkerchief and ball and sets them down on the table, ball to the back.
Performance Notes
The moves used here are easy to master, most of the manipulation being hidden by either the handkerchief or body position.
Next - Ball & Silk Mistery

24 April 2010

A Four Ace Trick

ourBy Sidney Carton
Having used a duplicate set of short Aces for use in this well-known effect for some time past (this being suggested by a chance remark made by Mr. Edward Victor, of which he has, apparently, no recollection,) the following easy way of getting the usual miracle to come to pass was evolved out of this idea, and a companion idea which was first utilized by Dr. Ford B. Rogers (an American) in quite another direction.
The following is the effect: Four Aces are, after some demur on the part of the performer, dealt face upwards on the table. Three indifferent cards are laid at the foot of each. The Aces are then turned over and pushed underneath their respective heaps of three cards. One heap is chosen, and at the last moment, before that chosen heap is placed aside in a rising card glass, the cards are ruffled before the assistant's eyes, and are seen to consist of one ace and three indifferent cards.
The other three heaps are shown each to consist of one ace and three indifferent cards, these are placed back in the pack, and the pack is shuffled. At the word of command the three Aces in the pack fly, for though the pack is ruffled over slowly under the assistant's eyes no Aces can be seen. The four cards are removed from the glass, and are shown to be four Aces - four cards only being shown, back and front.
The secret is that only one of the Aces is genuine. This is the one to go on the front of the chosen packet later. The other three Aces are shorts of a particular kind, and they are in duplicate, three of them (one set) having each an ordinary card glued to the back, as shown.
Once the set is made up the working should be clear. Three short single Aces are deal face up on the table with one ordinary, everyday Ace. On each of the shorts is dealt three indifferent cards, backing them are placed. The selection of that packet is forced, and the cards being slowly ruffled before the assistant's eyes allow the short Aces to 'run over' and only the ordinary Ace appears in front, and, apparently, three indifferent cards with it.
On placing the short Aces back in the pack, and after a shuffle for misdirection, etc., a ruffle will not betray their presence, and, to complete the effect, the little break each one makes will enable the performer to get control of them and palm them off before handing the pack on for further use.
Illustrating method of cutting the cards to form shorts.
Now, two tips which published versions of this trick seem to have overlooked. The shorts are not made short all along the top edge, but are cut as shown.
This is for the two following reasons. It leaves less of the ordinary sized indifferent card backing to show on exhibiting the four Aces, and also the short Aces when placed back in the pack can be pushed in, and ruffling the cards with the pressure exerted by the first finger of the right hand will allow them to 'run over.'
If the card is a thorough short there is practically a necessity to tap the pack on the table to send the card to one end before the pack can be safely ruffled without betraying the short cards' presence.
The second tip is to glue the cards together only by their lower edge as then they retain their flexibility and wear better.
Sidney Carton's A Four Ace Trick originally appeared in The Magic Wand, London, March 1915.
Next - A Four Ace Trick

Beadazzled

By Doug Edwards
Two large beads, one red, one green, are threaded on a shoelace or length of cord. Closing his hand around the beads, the magician wraps the ends of the shoelace around the hand. A spectator is asked to choose one of the beads, the magician moves his free hand over the top of the closed hand, then moves it away to show that one bead is now resting on top of the closed hand. He opens the closed hand to show that the other bead is still threaded on the shoelace.

I like the finger ring steal move in Earl Nelson's book 'Variations' (1978) but, because I already use a borrowed finger ring when performing Ring Flight, I wanted to adapt the move to a different premise. Beadazzled is the result.
You'll need a 24 inch / 60 cm white or black shoelace and two different color, hefty, round, 1 inch / 25 mm diameter plastic or ceramic beads with a hole through the center of each. The holes must be large enough for the shoelace to run freely. Wooden beads are fine as long as the holes drilled through them are sanded so they are smooth.
The beads are threaded onto the shoelace. The right hand holds the ends of the shoelace, the left hand moves between the loop formed to close around the beads. The right hand releases the ends so they fall to either side of the closed left hand.
Let's assume one bead is red and the other green. Openly thread the shoelace through both beads. By holding the ends of the shoelace with the right hand, a loop is formed with both beads hanging adjacent to each other. Move into this loop with your palm down left hand, close your fist lightly around the beads, and let the ends fall down at their respective sides.
The right hand picks up the lace end at the thumb side of the left hand ... ... and throws it over the top of the left hand. The right hand now moves under the left hand to take hold of the opposite lace end, at the same time getting hold of the bead closest to that end.
The right hand, concealing the bead, wraps the lace end around the closed left hand, in doing so the bead is secretly removed from the lace. The right hand moves away finger palming the bead ... ... then moves over and down onto the top of the closed left hand.
With the right hand, grab the strand that hangs from the side of the left thumb and toss/throw it over the back of the left fist. Now grab the other strand that's hanging from the left pinkie side and secretly steal the red bead in the act of wrapping this strand around the back of the fist in the opposite direction of the first strand. This steal is easy and almost self working as long as you relax the grip at the moment the bead is stolen. The bead simply drops into your waiting right hand.
The spectator selects one of the beads by color, then the right fingers slowly open ... ... and the right hand moves away showing the bead is now on top of the closed left hand, free of the shoelace. The left hand turns over and the fingers open to show the other bead remains threaded on the shoelace.
As the above steal is made, ask a spectator to name either color bead. Regardless of the answer, move the right hand (with the concealed red bead) on top of the left fist and slowly open the right hand.
If the red bead is indicated, show that it has magically penetrated upwards through your left hand. Should the green one be selected, state that you'll magically remove the red bead leaving the selected green bead still trapped on the shoelace.
Either way, the effect is truly magical and memorable.
Next - Beadazzled
Search